Handles running Shiny server with Docker.
Index
- How I got into Docker
- Making Shiny Docker
- Troubleshooting with Network
- Reference
How I got into Docker
Docker make server infra as a code and we can share anywhere!
Nightmare of installing library for Shiny
I had wondered why many developers love docker so much for a while. A few days ago, I got a chance to install docker in my company’s test server. The thing is that we have shiny server written in R in the test server. I still remember I had to be though install a bunch of library to exec shiny server and in installing process, our server even stop because of lack of CPU and memory. So for me, it’s like nightmare to make infra for shiny-server.
How I can move Shiny to other host machine?
And few month later, we have to move our server (on aws) to bigger one. It means I have to get shiny to the new server too. Finally, I decided using docker for this. Here is what I had been though running shiny in docker. Furthermore, now I can answer the question. It’s all about convenience. What make docker so special is that it make server just a program run by code. Writing code (dockerfile) and run it to have an image. The image is program to run server. In addition, we can use this image in any other host server.
Docker Hub
In terms of sharing, there is Docker hub which is docker version of git hub. When I make an image with Dockerfile, then push to my Docker hub. After that, I can pull it in other host. No need to write Dockerfile nor run Dockerfile to make an image. I can use the pulled image right away. I can say I saved a lot of time with making one. Making image in my localhost which prevent stopping the test server because of installing a tons of R library.
Making Shiny Docker
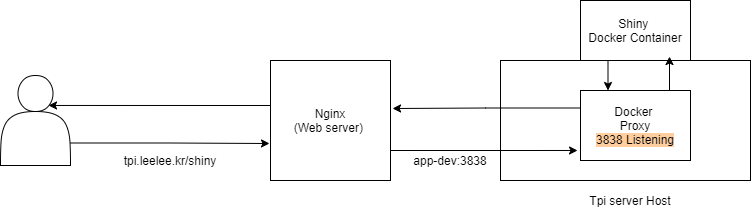
[Picture 1] is my goal of migration Shiny to Docker.
Write Dockerfile
Dockerfile
|
|
Dockerfile detail
Chose Docker Base Image
So, this is Dockerfile for my shiny-server. In FROM, we can chose base env for a container we are building. It could be ununtu, centos and even not just server, but server with installation, ubuntu + R for example.
At first, I went for R base container, but it didn’t work out. To save time, I decided to use other people’s docker images. FROM rocker/shiny:3.6.3, it contains basic linux + R + shiny-server.
Install Package
Now all we have to do are installing linux package to make proper shiny base server and library we used in the project code. In EXPOSE command, it does not mean this container expose its 3838 to outside. It’s more like telling me they will be exposed when running docker with -p options.
Copy or Mount?
As you can see, I tried to build image with the source code just like all in one package. In the last part of Dockerfile, it will COPY the source code dir in host and run it in the container. What if this is not complete project and we will change the code many time? With this Dockerfile, we have to make a new image everytime to make updated image. Without doubt, it will take a lot of time. To avoid this problem, I choose mount option.
Run Docker Command
Docker Command
|
|
Docker options
-d: run it in background-p: expose port. (host port:container port)-it: make interactive console to control docker container—rm: remove this docker process when it gets stopped
Working with docker hub
I was surprised that I have to match docker image name with my docker repository name if I want to push the image to the repo. So, I had to change the image name first.
Push Docker Image to Hub
# change docker image name
docker tag shiny_try:0.1 absinthe4902/shiny_try:0.1

# login to docker hub
docker login

# push the image
docker push absinthe4902/shiny_try:0.1

#########
# when pulling repo
docker pull absinthe4902/shiny_try:0.1
And Everything is done! Now we can see the shiny docker container is running in host machine. Finally, all we have to do is configure nginx to let the docker container get request when client send a request to host machine. This is a normal way to run docker container.
Troubleshooting with Network
Sadly, this is not finished… I did something wrong during the process. It was very small mistake. I think I missed exposing/connecting docker container port to host port. To solve this, I just added -p options. Before this. I had to search about Docker network.
I was quite confused the meaning of bridge, so I searched the concept first with I understood the concept first with [nat and bridge].
NAT
- Getting ip from host
- Using NAT, the virtual machine’s router is host. It let us control access and see deep down level of traffic ake
Ip packetsandTcp datagrams.
Bridge
- Getting ip from Router
- Using Bridge, the virtual machine does nothing with host. Host still see the traffic, but it’s not specific. Only
Ethernetlevel.
So basically, when I work with nat, my virtual machine get one more depth. In the other hand, bridge makes the virtual machine have the same depth as host, I can see the same subnet between host and virtual machine.
Docker network structure
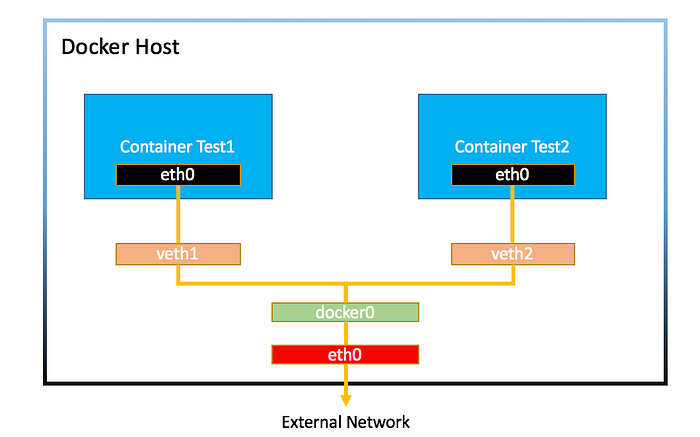
In Docker container, there are individual network namespace. It will have their own Ip as well. Before exposing port, this normal conatiner is not available from outside of host. (can work inside of host). With -p options, we expose our 3838 port. Let’s see what happen.
Monitor After Exposing Port 3838
|
|
There is a secret agent with docker network, docker-proxy.
Docker Proxy
When exposing 3838 port, we will see our 3838 port is active, and secretly docker proxy is listening 3838 port! Docker proxy is the one who pass the request from host to docker container. Each exposed container have one Docker proxy. It’s like this flow. Without docker proxy, the request bind by host 3838 cannot be passed to container 3838.
Routing Flow
Client → host → Docker proxy (kind of intercept) → docker0 (docker inner network bridge) → container.
Monitor Chaining Network wit iptables
|
|
Iptables
Actually, iptables does this work instead of docker proxy. In some kind of special situations, we cannot depend on iptables, and we should use docker proxy. So it’s more like backup. As I said, in special occasion, we have no choice using docker proxy. However, this proxy needs a bit of resource, and it can be disabled as well. It depends on server status and our decision.
Reference
For myself,
Recommend reading ‘deep down of docker’ one day for myself. It’s post about deep inside of docker and I might understand how docker work in linux level.
Now I have a feeling, I had a huge confusion of docker network. I thought docker with host which is actual network between host and docker. If I want to dig container-container network, I should read Docker official document. [docker network]